Advanced Topic 13 Continued II
Contents
Command line option
The serial tilter functionality is turned on/off via a command line option of the MiniSim visual server, shown below. To turn on the tilter, add the option "-tilter port_no" in the NadsMiniSimVisualServer.bat file under the bin folder, where port_no is the serial port number on the MiniSim computer that the tilter is connected to via the serial port adapter. For example, if the serial port is named COM4, then the port number is 4.
Check Port Number
To check the serial port the adapter is connected to, right click on "my computer" on the Windows Start Menu, and then choose "Properties". A "System Properties" dialog will pop up. Select the "Hardware" tab, and then click on "Device Manager". Expand the "Ports (COM & LPT)" entry, and a list of serial ports (Communications Port) on the computer will be shown. If there are multiple COM ports, unplug the serial port adapter from the USB port, and see which COM port is removed from the list. Please note that if the adapter is plugged in a different USB port slot, a different COM port will likely be assigned to it. To configure the text display of the titler, please refer to the section on MiniSim configuration files.
Configure the MiniSim Serial Titler
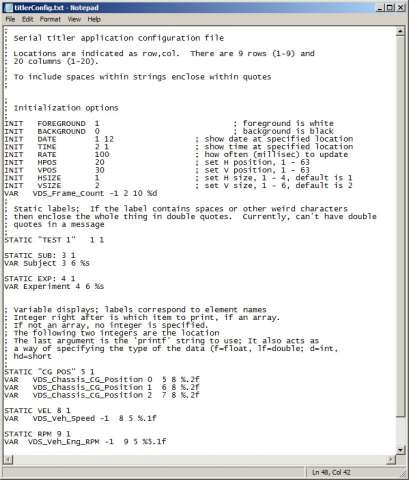
Lastly, please refer to the section titlerConfig.txt in the Configuration Files section of the manual to configure the text that will be displayed on the titler. It is already pre-configured to display the following variables:
Subject ID Experiment ID
VDS_Chassis_CG_Position
VDS_Chassis_CG_Position VDS_Chassis_CG_Position VDS_Veh_Speed
VDS_Veh_Eng_RPM
The contents of the titlerconfig.txt file are shown below:
Configure the Horita SCT-50 Serial Control Titler
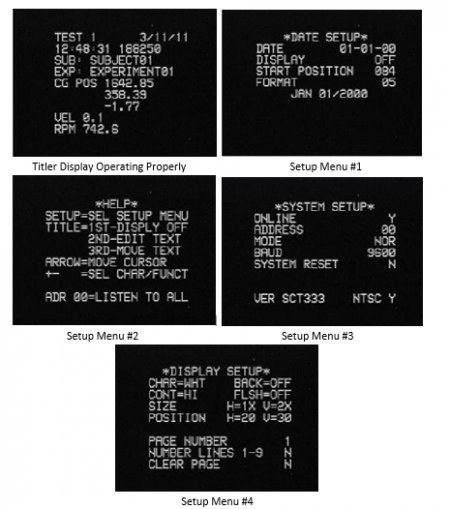
If the command line option is set, the titer will run every time the MiniSim is launched. When this happens, the miniSim initially sends the titler formatting data, then it commences sending data. All that should be required to make the titler display correcting is to turn the unit on, press the ‘Titler’ switch on the front panel once, then launch miniSim.
If the unit does not display serial data correctly, the correct settings from the five setup screens are shown below. Refer to the SCT-50 manual for the function of these settings.
Trouble Shooting
- In most cases, if the miniSim does not start or transition normally, just quit it and try again. If that does not solve the problem, reboot the computer and try again.
- If the miniSim does not start after repeating the above steps several times, verify the environmental variables listed below are set correctly.
On a single-PC miniSim:
- MININADSROOT=C:\NadsMiniSim_x.xx
- MININADSREMOTEROOT=C:\NadsMiniSim_x.x.x
- MININADSVISUALSROOT=C:\NadsMiniSim_x.x.x
- MININADSROOTDRIVE=C:
- At the start of a drive, when the scenario is being loaded, the MiniSim may appear unresponsive. Depending on the complexity of the visual database and the scenario, the period may last up to 3 minutes. During a drive, sometimes the visuals may pause for a brief moment when it is paging the database or creating a new object.
- The frame rate of the miniSim is targeted at 60Hz. However, in some scenarios, the high complexity of the visuals or the scenario may cause the performance to deteriorate, and the frame rate may drop to 30Hz at spots. In those cases, the ownship vehicle and scenario vehicles will appear slower than what they are supposed to be, and visual jitters will occur. The presence of the inset view or the side view mirrors will add to the demand on visual rendering, and may cause the performance to further deteriorate.
- The realistic headlights are a relatively new addition. Past visual databases were not optimized for the presence of the headlights, therefore during night scenes running on such databases, visual artifacts may appear. Visual databases belonging to this category include those used by the DSC scenarios, the kiosk scenarios, and the ESC scenarios. The Impact scenario and the visual database it uses are still in development stage, so some visual artifacts may also occur.
- If the MiniSim crashes during a drive for some reason, close the front end GUI by clicking the “×” icon on the top right corner of the GUI window. This should cleanly shut down all the MiniSim processes that are still running.
- In the rare case when the GUI does not pop up automatically after the MiniSim icon is double clicked, run the Windows application “regedit” on the front end computer, and delete all the values under HKEY_CURRENT_USER\Software\UI *After a drive, when another scenario that uses a different visual database is started, the likelihood of the simulator not transitioning correctly is higher than restarting the same scenario or another scenario using the same visual database. If the simulator hangs, perform the steps described in the first item of this list. Among the included scenarios, the two DSC scenarios share the same database, the ESC scenarios share the same database, the three Kiosk scenarios share the same database, and the Impact scenario uses its own database.
Updating the MiniSim
- To update the MiniSim software, use the appropriate installation disk provided by NADS.


