Difference between revisions of "Advanced Topic 13 Continued II"
(Created page with "==Command line option== The serial tilter functionality is turned on/off via a command line option of the MiniSim visual server, shown below. To turn on the tilter, add the...") |
|||
| Line 4: | Line 4: | ||
[[File:Figure33.png|450px|thumb|center|The NadsMiniSimVisualServer_nves.bat folder showing the –titler option (line 2). Note the first and third lines are not being used, as they are commented out using the ‘rem’ at the beginning.]] | [[File:Figure33.png|450px|thumb|center|The NadsMiniSimVisualServer_nves.bat folder showing the –titler option (line 2). Note the first and third lines are not being used, as they are commented out using the ‘rem’ at the beginning.]] | ||
| + | |||
| + | ==Check Port Number== | ||
| + | |||
| + | To check the serial port the adapter is connected to, right click on "my computer" on the Windows Start Menu, and then choose "Properties". A "System Properties" dialog will pop up. Select the "Hardware" tab, and then click on "Device Manager". Expand the "Ports (COM & LPT)" entry, and a list of serial ports (Communications Port) on the computer will be shown. If there are multiple COM ports, unplug the serial port adapter from the USB port, and see which COM port is removed from the list. Please note that if the adapter is plugged in a different USB port slot, a different COM port will likely be assigned to it. To configure the text display of the titler, please refer to the section on MiniSim configuration files. | ||
| + | |||
| + | ==Configure the MiniSim Serial Titler== | ||
| + | |||
| + | Lastly, please refer to the section titlerConfig.txt in the Configuration Files section of the manual to configure the text that will be displayed on the titler. It is already pre-configured to display the following variables: | ||
| + | |||
| + | Subject ID Experiment ID | ||
| + | |||
| + | VDS_Chassis_CG_Position | ||
| + | |||
| + | VDS_Chassis_CG_Position VDS_Chassis_CG_Position VDS_Veh_Speed | ||
| + | |||
| + | VDS_Veh_Eng_RPM | ||
| + | |||
| + | |||
| + | The contents of the titlerconfig.txt file are shown below: | ||
| + | |||
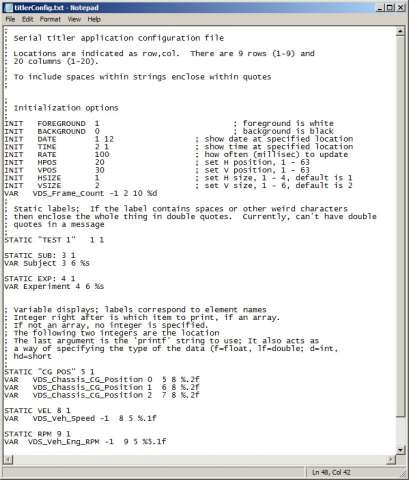
| + | [[File:Figure34.png|450px|thumb|center|Figure34: Serial Titler Configuration File (as shipped).]] | ||
| + | |||
| + | ==Configure the Horita SCT-50 Serial Control Titler== | ||
| + | |||
| + | If the command line option is set, the titer will run every time the MiniSim is launched. When this happens, the MiniSim initially sends the titler formatting data, then it commences sending data. All that should be required to make the titler display correcting is to turn the unit on, press the ‘Titler’ switch on the front panel once, then launch MiniSim. | ||
| + | |||
| + | If the unit does not display serial data correctly, the correct settings from the five setup screens are shown below. Refer to the SCT-50 manual for the function of these settings. | ||
| + | |||
| + | [[File:help.png|450px|thumb|center]] | ||
Revision as of 18:05, 20 October 2016
Contents
Command line option
The serial tilter functionality is turned on/off via a command line option of the MiniSim visual server, shown below. To turn on the tilter, add the option "-tilter port_no" in the NadsMiniSimVisualServer.bat file under the bin folder, where port_no is the serial port number on the MiniSim computer that the tilter is connected to via the serial port adapter. For example, if the serial port is named COM4, then the port number is 4.
Check Port Number
To check the serial port the adapter is connected to, right click on "my computer" on the Windows Start Menu, and then choose "Properties". A "System Properties" dialog will pop up. Select the "Hardware" tab, and then click on "Device Manager". Expand the "Ports (COM & LPT)" entry, and a list of serial ports (Communications Port) on the computer will be shown. If there are multiple COM ports, unplug the serial port adapter from the USB port, and see which COM port is removed from the list. Please note that if the adapter is plugged in a different USB port slot, a different COM port will likely be assigned to it. To configure the text display of the titler, please refer to the section on MiniSim configuration files.
Configure the MiniSim Serial Titler
Lastly, please refer to the section titlerConfig.txt in the Configuration Files section of the manual to configure the text that will be displayed on the titler. It is already pre-configured to display the following variables:
Subject ID Experiment ID
VDS_Chassis_CG_Position
VDS_Chassis_CG_Position VDS_Chassis_CG_Position VDS_Veh_Speed
VDS_Veh_Eng_RPM
The contents of the titlerconfig.txt file are shown below:
Configure the Horita SCT-50 Serial Control Titler
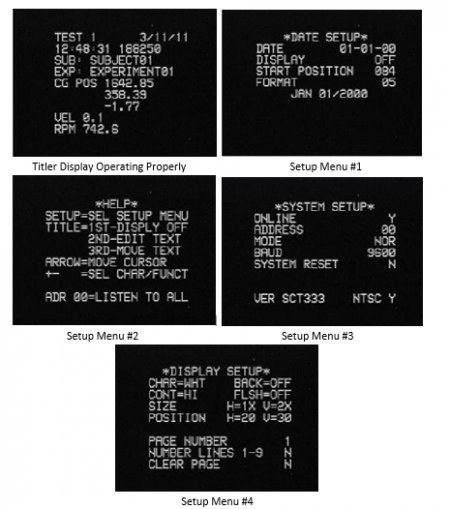
If the command line option is set, the titer will run every time the MiniSim is launched. When this happens, the MiniSim initially sends the titler formatting data, then it commences sending data. All that should be required to make the titler display correcting is to turn the unit on, press the ‘Titler’ switch on the front panel once, then launch MiniSim.
If the unit does not display serial data correctly, the correct settings from the five setup screens are shown below. Refer to the SCT-50 manual for the function of these settings.


