Advanced Topic 2
Configure the MiniSim
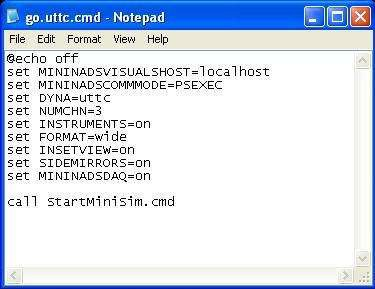
The MiniSim setup has several options that can be set by updating the startup file. Right click the gold “Start MiniSim” icon on the desktop of the front end computer and select “Edit”. This will bring up the start up file in a text editor. Several lines in the file can be changed, Figure 25:
- INSETVIEW: set it to “ON” to enable the inset view window that shows a chase view of the ownship vehicle. Set it to “OFF” to disable the inset view. See Advanced Topic 3 for more information.
- MININADSDAQ: Set it to “ON” to activate the data acquisition subsystem of the MiniSim, which collects driver and scenario data during each drive and saves it to a file with a “.daq” suffix. Set it to “OFF” to deactivate the data acquisition subsystem. See Advanced Topic 5 for more information.
- SIDEMIRRORS: Set it to “ON” to enable the side view mirrors. Set it to “OFF” to disable them. In a single-channel configuration, the placement of the side view mirrors does not look natural, and it is probably better to disable them. The center rear view mirror is always enabled.
The front end computer may have already been set up to contain multiple MiniSim start up icons with different options, for example, one icon for running the MiniSim without inset view, and another one for running the MiniSim with inset view. In any case, the icon for the standard setup of running without inset view or side view mirrors and with data acquisition subsystem activated will be present
Advanced Topic 3 – Inset View Control
If the inset view is enabled, the position and angle of the chase view camera relative to the ownship vehicle can be adjusted interactively during each drive. Use the keyboard and mouse set for the visuals computer to make the adjustment:
- Mouse movement with left button pressed: panning the camera;
- Mouse movement with right button pressed: rotating the camera (rotational axis is dependent on cursor position);
- Mouse movement with both buttons pressed: zooming the camera.
Advanced Topic 4 – Installing a Database and Scenario
To install a new visual database and scenario, use the appropriate installation disk or zip file provided by NADS.
You may also use the dbinstall command as described in the NADS TMT User guide
If you choose to do it manually, the steps involved include:
For a visual database called sample_rural you will need to do the following:
- Copy the folder containing the database (DB) visual files (.flt or .ive) in the
C:\Nads_MinSim_x.x\Data\Visuals folder. In this case, the folder will be named sample_rural.
- Copy the Binary Logical Interface (.bli) file to the C:\Nads_MinSim_x.x\Data folder'. In this case, the file will be named sample_rural.bli
- Copy all Switch Control Log (.scl), FTR (.ftr), or summary (.summary) files of the same name as the database folder name to the C:\Nads_MinSim_x.x\bin folder. Some DBs may not have .scl or .ftr files.
- Modify the C:\Nads_MinSim_x.x\bin\SetupEnv.cmd:
- Add a line to the database definitions set SAMPLE_RURAL_DB=%MININADSROOT%\data\Visuals\sample_rural
- Add a path variable to the set OSG_FILE_PATH line. Be sure the name is bracketed by the percent symbol %, and is separated from other variable by a semi-colon ; as shown in the example line below:
Set OSG_FILE_PATH=%OSGDB%;%PRESENTATIONDB%;%TILETX%;%MODELS%; %ESC_DRYDB%;%SAMPLE_RURAL_DB%
To install the scenario, you will need to do the following:
- The scenario can be a new one authored using ISAT on the desired .bli, or an existing one in another MiniSim installation, or obtained it from NADS. Note that the scenario or SCN file can be named differently from the name of the database it was created on, and will end with a .scn
- Launch MiniSim and click on the Import button
- Navigate to the scenario file and hit OK.
- The import function will copy the scenario .scn file to the C:\Nads_MinSim_x.x\Data folder, and create an .eif file of the same name in the C:\Nads_MinSim_x.x\Data\RCM_data folder.
- Note that the file names in the C:\Nads_MinSim_x.x\Data\RCM_data folder are the ones that appear on the scenario pick list on the MiniSim control panel.

