Actions
ISAT User's Guide Table of Contents
Contents
- 1 Actions
- 1.1 Create Element
- 1.2 Remove Element
- 1.3 Set Button
- 1.4 Set Dial
- 1.5 Use Traffic Manager
- 1.6 Play Audio
- 1.7 Vehicle Failure
- 1.8 Traffic Light
- 1.9 Log Data
- 1.10 Terminate Simulation
- 1.11 Pre-position Motion Base
- 1.12 Tune Motion Base
- 1.13 Place Phone Call
- 1.14 Start/Stop Data Reduction
- 1.15 Set Variable
- 1.16 Write Cell
- 1.17 Set Visual Display Text
Actions
Once a trigger fires, it performs one or more actions. The possible actions are independent of the trigger type. The following actions are defined, along with action-specific parameters.
Create Element
This parameter creates a new scenario element. The new scenario element can be an ADO, DDO, environment condition, or a traffic source.
Remove Element
This parameter removes scenario elements from the scenario. The actual elements to remove (the Target Set) are specified though another set of parameters as follows:
| Name | This is a set of names; any element whose name matches any name in the set is deleted. |
| Type | This is a set of SOL types; any element whose type matches any type included in the set is deleted. |
| Geometric Position | This is a circular region; any element in that region is deleted. |
| Instigator Set | This parameter is Boolean. If set, it indicates that the trigger will delete the elements that caused the trigger to fire. See Section 10.1.1 for a more detailed description of the Instigator Set. |
Set Button
This action presses the button of an element in the scenario. See the individual descriptions of scenario elements for details on the actual effects of pressing their buttons. The Target Set is specified the same way as in Remove Element.
Set Dial
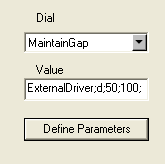
This action sets the dial of an element in the scenario. Such as, you can select a vehicle failure, that which will cause the participant’s vehicle to fail in some manner during the drive, or a “Lane Change” to cause a ADO to change lanes. See the individual descriptions of scenario elements for details on the actual effects of setting their dials. The Target Set, is the set that is effected by the dial, it is specified the same way as in Remove Element.
The define parameters button brings up a dialog to define to help build the dial string. This string may have to be manually modified by the user. Some actions may have additional dialog to help build more complex dial strings such as the forced velocity dialog (Figure 5-52).
Use Traffic Manager
This action forces the traffic manager to use a different Traffic Manager Input Sets (TMIS). See Error! Reference source not found. For details on how to define TMIS.
The sole parameter associated with this action is the name of the TMIS.
Play Audio
This action causes a specific sound to be played in the simulator audio system. The sole parameter associated with this action is the identifier of the audio message.
Vehicle Failure
This action causes a failure on the simulator vehicle. The following types of failures can be programmed:
| Tire blowout | A tire blowout forces any of the tires to fail. A failure can be
instantaneous or gradual. If gradual, the amount of time it takes for the tire to go flat can be specified. |
| Brake failure | A brake failure forces the brake system to fail. When specific tires are involved in the failure, the actual tire can be specified and the severity of the failure can also be specified. The following failure modes are supported:
|
| Alert conditions | These are various alerts corresponding to various lights in the dashboard. The following are the corresponding alert conditions:
|
| Speedometer failure | In a speedometer failure, the speedometer shows incorrect speed but still a linear function of actual speed. A percentage is specified as the error factor. |
| Tachometer failure | This operates the same as speedometer failure, but affects the RPM indicator. |
| Cab Components | Failures can be triggered for the various cab components as follows:
|
Traffic Light
This action causes a particular traffic light to go into a specific state within a given amount of time. Both the traffic light and time are specified. Note that forcing a specific traffic light to a new state will change the timing of the overall intersection. See Chapter 9 for more details on how forcing traffic lights to new states affects the TLM.
Log Data
This action writes a value to a logstream. The logstreams will be readable in the DAQ file after a scenario has been run, and is useful to denote certain events in scenario. For instance, it may be useful to denote when the driver is 500 feet from an intersection.
Terminate Simulation
This action causes the overall simulation to terminate.
Pre-position Motion Base
This action causes the motion base of the NADS to select a new neutral point. The actual neutral point is specified though the actuator displacements. The idea behind this action is to move the motion in a location that allows better performance when the upcoming maneuver is known.
Tune Motion Base
This action selects a new set of tuning parameters for the motion system. Different tuning parameters provide better response on different road types. For example, a tuning file may work best for highway driving but perform poorly on city streets. This action allows selection of the tuning parameters at runtime.
Place Phone Call
This action causes the system to place a phone call. This action was developed specifically to support driver distraction work, in that it provides a deterministic method for initiating phone calls that have to be answered by the simulator driver. The actual implementation of this action requires cooperation with additional hardware and software installed at the NADS.
Start/Stop Data Reduction
The start and stop data reduction are one of the more important trigger actions, they instruct the simulation to either start a data reduction or stop a data reduction. A data reduction is used to produce data about an “event”, such as a driver being cut off, or an object falling of the back of a truck. For example, if a vehicle in front of a participant suddenly brakes and the user is boxed in from the side by another vehicle such that the participant cannot change lanes. In this instance, we would want to know how long it takes participant to apply the brakes from first seeing the vehicle make a sudden stop. We can do this by first inserting a trigger to fire a “start data reduction” action when the car in front of the participant’s vehicle stops, and then inserting a trigger with a “stop data reduction” to fire when the participant steps on the brake pedal. This will later produce data describing how long it took the driver to react to the event.
Start and stop data reductions produce embedded data reduction items. The advantage with embedded data reductions items is that they will automatically produce reduction data reports after the data is in the post-processing phase. Embedded data reduction saves time over other data reduction techniques
Each data reduction is identified by its group number, its variable, and its column name. Each data reduction must have at least one “start data reduction” action, and one “stop data reduction” action. Each data reduction may have multi “start data reduction” actions, and multiple “stop data reduction” actions.
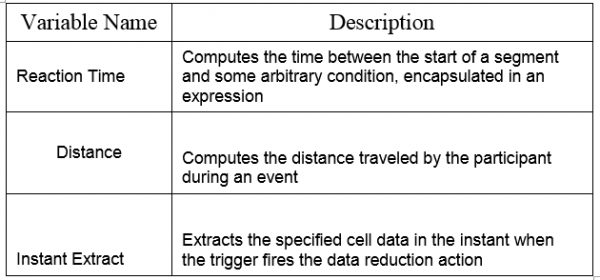
The data reduction variable describes the type of data reduction to be performed, the group number is used when more than instance of a type of variable is used, then group number can be set to differentiate between the two data reductions. The column name is used to describe the data reduction. Figure 9-64 describes the data reduction variables.
When a start or stop data reduction action has been selected, hit the “params” button to select the settings for the stop and start data reduction. When inserting a “stop data reduction” action, you will have a choice of selecting the variable, and the group. By double clicking the variable type it will select the variable type and bring up the define parameters dialog (Figure 9-66). Here you can specify the column name, that which should be unique for the group. Multiple starts can have the same column name as long as they also have the same variable name as well; in essence, they are the same start data reduction. It will often be necessary to start a data reduction at multiple points.
The stop data reduction is slightly different from the start data reduction. When the “params” button is hit, it brings up a list of start data reductions. Start data reductions with checks by them have already been paired with a stop. It is ok to select a stop data reduction that already has a stop selected. The data reduction can be set by either then double clicking on the variable name, or by double clicking on one of the start data reductions. This will bring up the set parameters dialog; this is the same as the start data reduction except the column name can only be selected from a drop down list. By clicking on "start data reduction" it will bring up the parameters dialog with the start data reductions column name already selected and the group number will be switched to match the start data reductions group number. Multiple stops can be selected for the action, but they all must have the same group number.
Set Variable
The set variable action set a given variable to a given value. This can be used to reset a variable that is used as a counter between simulation runs.
Write Cell
This action writes a value to a cell.
Set Visual Display Text
This action displays text visible to the participant during the drive.


