Reuse through Groups
ISAT User's Guide Table of Contents
Contents
Reuse through Groups
Groups can be used to store groups of objects in a separate file. This allows these groups to be imported in other scenarios or linked to another scenario. When a group is imported, it adds a copy of the group to the scenario file. Any changes to the elements in these groups will not affect the original group file. When a group is linked or added as an external reference, this adds a reference to the file in the scenario file, and does not store the actual members of the group. This means that when a group files is added as external reference the group file must always be kept with the file. In addition, you cannot modify members of groups that are added as external references. This has the advantage of allowing a single section of a scenario to be saved as a group and used across multi scenarios. Groups are discussed in detail in section 3.18.
Appendix A: Authoring a Lead Vehicle Pull Out (LVPO) Event
This section is a tutorial designed to help a beginning scenario author to develop their first useful scenario. In this particular example, we are going to demonstrate Lead Vehicle Pull Out (LVPO) event. A LVPO event is when a car pulls out in front of the external driver (participant), in this particular example when a the external driver approaches a intersection we are going to have a vehicle pull out in front of them, effectively cutting them off.
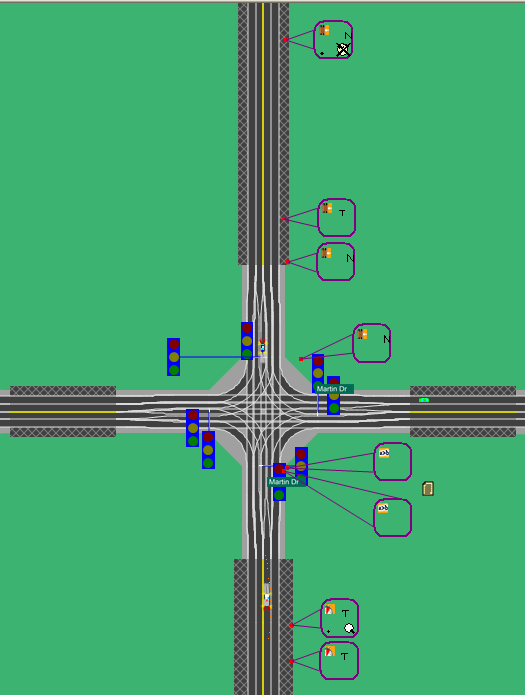
For this tutorial, you may select any LRI with a 3 or 4-way intersection with traffic lights. For this example, we chose WirelessUA.bli, and used the southern most intersection.
Step 1
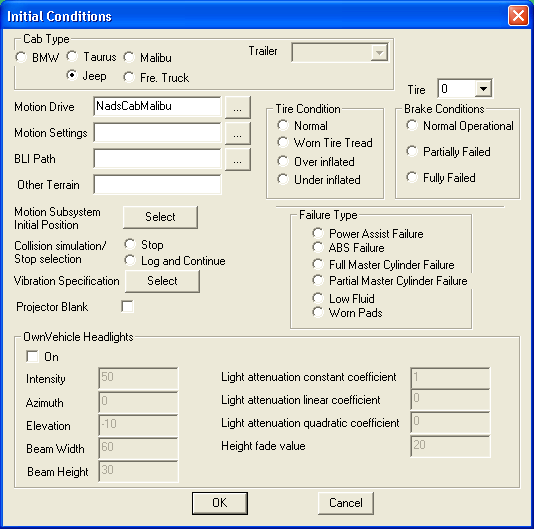
Place the external driver. The external driver represents the participant vehicle in the simulation, for this example we need to place the driver significantly far away from the intersection that our event is to take place. The driver must take longer than 10 seconds to travel from there starting point to the intersection. To place the external driver, go to Insert->External Driver in the main menu. This will allow you to insert the external driver like any other scenario element. Once the external driver has been place, you can edit some of the external driver settings by going to Edit->Initial Condition. This will bring up the initial conditions dialog that which will let you change the cab type and make other general changes.
Step 2
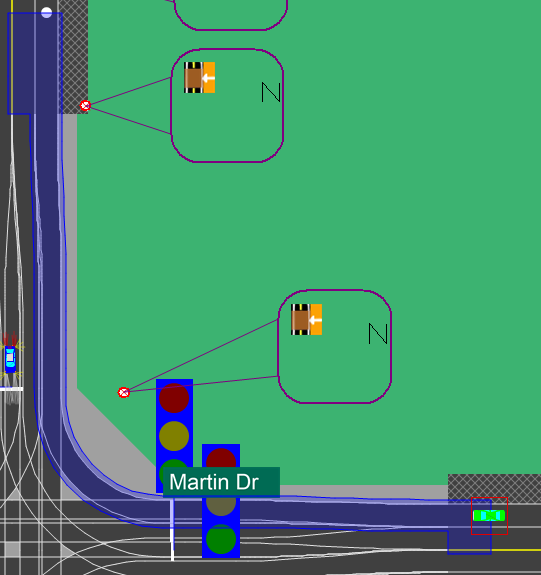
Place the Lead Vehicle. Now that we have placed the external driver, we need to place the lead vehicle that is to cut off our participant, hence creating our event. We need to select a ADO. To place an ADO go to Insert->ADO from the main menu, or by clicking on the ADO button on the toolbar. The Lead Vehicle needs to be placed such that it can make a right hand turn in front of our driver. In addition, the ADO needs to be close enough to the intersection that it is stopped at the intersection before the start of the event. Once we have place the Lead Vehicle we need to instruction it to make a right hand turn. This can be done by specifying the Lead Vehicle’s path. To do this, right click on the Lead Vehicle, and select the extend path option, and click on the lane the Lead Vehicle will be turning onto, past the intersection. This will place a blue path showing the path the Lead Vehicle will travel. Once the Lead Vehicle reaches the end of the path it will just continue as normal.
Step 3
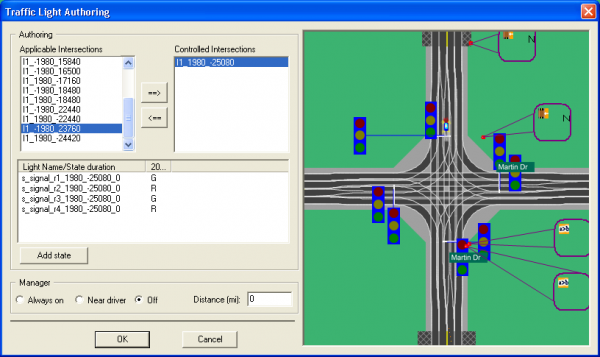
Setting up the traffic lights. In order to make sure the lead vehicle waits at the intersection for the external driver to approach we need to make sure the light at the intersection is red. We do this through the traffic light manager. The traffic light manager can be accessed through Edit- >Traffic Light Manager. Select the relevant traffic light from the applicable intersections list and press the button. This intersection will now be placed in the controlled intersections list. Now click on the intersection in the controlled intersections list. This will bring the state of the traffic light in the middle list box. When you click on the light name in the name in the list box it will highlight in the mini ISAT view the light the name is connected too. In order to change the state on the light, right click on the light value in the next column over from the light, it will list the lights state (R, G, Y). Once you right click on the light it will pop up a menu that you can select the state of the light from. For this example we will want the light the external driver is traveling on to be green, and the other lights to be red.
Step 4
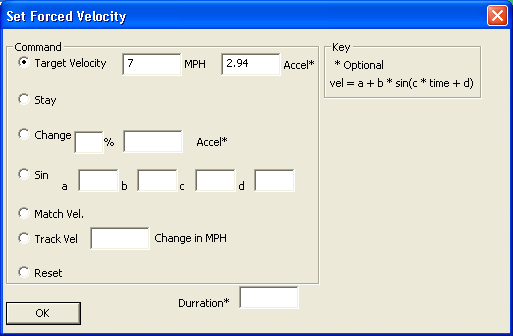
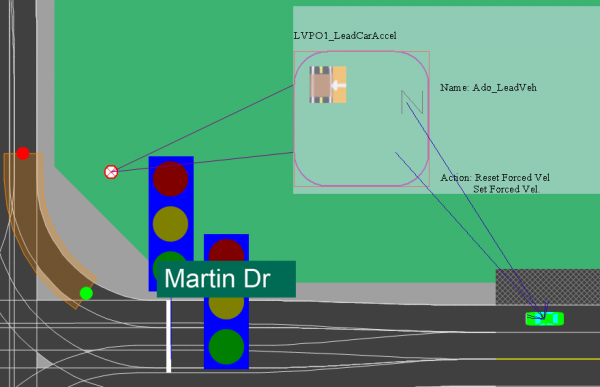
Lead vehicle pull out. In this step, we want to cause the lead vehicle to make a right turn when the driver is within 7 seconds of the intersection. Remember triggers operate effectively as “if then” statements, if its predicate is satisfied then execute the action(s). We will place a road pad trigger and a time to arrival trigger to accomplish this. The first step is to place the time to arrival trigger. The road pad trigger can be inserted from Insert->Time to Arrival menu. Once placed, ISAT will bring up the road pad trigger settings dialog. On the predicate tab, place the time as 7, and hit the “Set Ext Driver” button, this will select the external driver as the predicate set (only the members of the predicate set may be evaluated by the predicate). Next click on the Actions tab. Hit the new button and select “Set Dial” in the “action type” combo box, and “ForcedVelocity” in the Dial combo. Next, hit the “Set Params” button. This will bring up the Set Forced Velocity dialog. Select Target Velocity and set MPH to 7 and Accel to 2.9. This will cause the target to accelerate to 7 Mph at a rate of 2.9. Hit “OK”. In the Action tab, select under “who to effect” the “Name” option and hit the “…” button to the right of the name option. This will pop up a dialog. Add the “Lead Vehicle” to the candidate set. This action will force the Lead Vehicle to start pulling out in front of the external driver.
Next, we place the road pad. We do this by right clicking on the road pad trigger and selecting the “place road pad” option. The road pad needs to be placed such that its start point is far enough away from the intersection that we can catch a driver driving well above the speed limit. The end point needs to be placed such that if the driver is going well below the speed limit they will still be on the pad when they are 7 seconds from the intersection. The green dot is the start point, the red dot is the end point, and the orange dot is the target point. Place the target point just past the intersection around the point where the external driver and the lead vehicles paths would first intersect.
Now that we have placed the Time to Arrival trigger, we want to place a road pad trigger that will fire when the lead vehicle starts to turn right. This trigger will speed the lead vehicle up to the speed limit. By placing two trigger to cause the lead vehicle to speed up we can create a more natural looking turn. Road pad trigger can be inserted from the Insert->Coordinators->Road Pad Trigger menu. The road pad trigger will be set up in the same manner as the time to arrival trigger, except the lead vehicle will be the only member of the predicate set. On the actions tab we need to first add a “reset dial” action, with ForcedVelocity set as the Dial. Also, the sequential option needs to be selected, and Delay (bottom of the tab page) should be set to .1. In addition, we need to set the who to affect option to select the lead vehicle just like we did with the time to arrival trigger. The purpose of the reset dial action is to inform the lead vehicle that it is no longer supposed to follow the previous forced velocity dial, and it needs at least one frame to reset itself.
Next we want to add a set forced velocity action. This will be the same as the set forced velocity action from the time to arrival trigger except the speed now will be set to 35, the acceleration will be 2.9 as well. Again, we need to set the Who to Affect options to the lead vehicle. This must be done for each action. The last thing we need to do is to place the road pad. So right click on the road pad trigger and select place road pad. The road pad should be place the same as the bellow figure.
Step 6 Testing
Now that we have, the basic elements of our event down, we can now use the rehearsal mode to insure that our event is working. The icon in the mode tool bar to enter the rehearsal mode. Here we can “run” the scenario. You can also start the rehearsal mode through the menu Mode → Rehearsal. The rehearsal mode will run two iterations of dynamics and one iteration of behaviors every frame. The behaviors and dynamics modules are also used in the NADS. Press the play button on the rehearsal dialog to start the simulation. The lead car should be pulling out just in front of the external driver in this scenario. If the lead vehicle is not pulling out in front of the external driver, we will have to check our setting on the individual scenario elements. Is the “SetForcedVel” action set right? Is the Time to arrival trigger firing?
Step 7 Data Reduction
Data reduction effectively adds markers into the data stream to help calculate certain data. Such as you can insert a “Reaction Time” data reduction event. This will provide data on the reaction time to an event quickly. In this particular event, we want to monitor the reaction time of the participant to the lead vehicle pulling out. Here we will be monitoring the time it takes the user to take their foot of the gas pedal, and the time it takes the user to apply the brakes. This first step in this process is to add a start data reduction at the start of the event. To do this we will make a time to arrival trigger that is identical to the time to arrival trigger that we inserted in step 2. The only difference is that we will not be inserting a set dial action. Instead, we will place a “start data reduction” action. We could use the same trigger as we do to advance the lead vehicle to the intersection to start our data reduction, but if we make some changes to that trigger, like adding additional sequential actions, our start data reduction action might not be fired at the correct time.
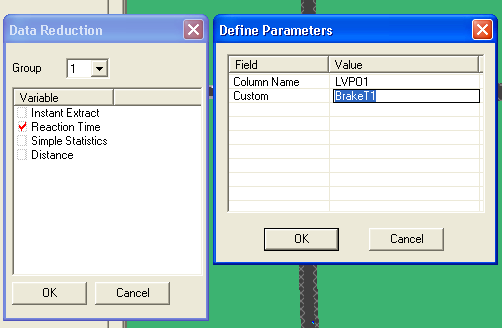
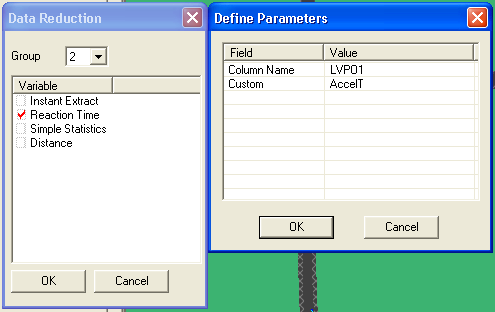
In this particular case, we are going to want to measure the reaction time of our participant to the event. We will measure this by measuring the time it takes the participant to take their foot of the gas pedal, and how long it takes the participant to apply the brakes. We will need two separate “start data reduction” actions for this event since we are measuring two separate reaction times. So first add a new action and select “Start Data Reduction” under action type. Then hit the parameters button. This will bring up the data reduction dialog. Set the group to one, and double click on “Reaction Time”. This will bring up the define parameters dialog. We will set the Column name to “LVPO1”, which which will identify the event, and Custom we will type in “BrakeT1”, this will identify this data reduction as measuring the brake pedal. Now hit “OK”, on the Define Parameters dialog and on the Data reduction Dialog. Now we can add our second data reduction. We will repeat the same process we used for inserting the first start data reduction action except we will set the group number to 2 in the “Data Reduction” dialog and set “Custom to “AccelT” in the Define parameters dialog. This will indicate that we are starting measure the gas pedal reaction time.
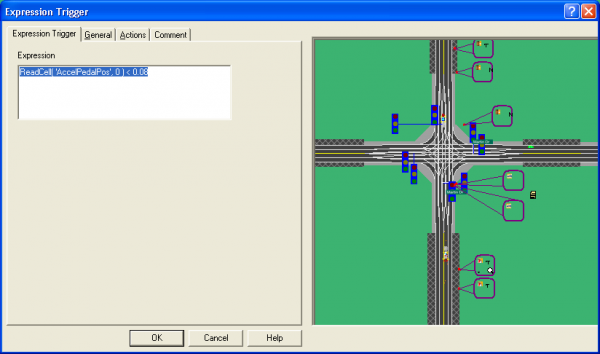
Now that we have our start data reductions set up, we need to add our stop data reductions. This will place a stop marker in our data stream, that will inform the data reduction that this event has stopped. In this case it will then measure the reaction time for the event as that is what we have specified as the data reduction type. We will use an expression trigger to fire our stop data reduction events. We will need two expression triggers, one for the brake pedal, and one for the accelerator pedal
