Scenario Building Help
ISAT User's Guide Table of Contents
Contents
Scenario Building Help
Appendix C: Scenario Authoring Help
This section is intended as a little quick help in getting started with the ISAT. The manual contains many more details on all aspects of scenario authoring.
External Driver
To determine to scenario’s starting location select Insert->External Driver this turns the cursor into the insertion cursor, and when you hit enter, will insert the External Driver into the scenario. The External Driver appears as a car (or truck) with all its lights on. When the simulation run begins, the driver will start in the location and orientation specified by the External Driver. It is best to position the External Driver on a road, since the simulation may become unstable if it is not. The External Driver is also sometimes referred to as the ExternalDriver, Own Vehicle, Ownership, or simply Driver.
ADO
These are Autonomous Dynamic Objects, semi-intelligent cars that you can insert into the scenario. They will follow the road network, adhering to the rules of the road, and responding to other cars. ADOs should only be placed on roads, because their behaviors only work there, and the simulation may become unstable if they are off road. When they are first inserted, they have settings in there default state. Most of these settings you won't want to change, but you will want to change the its model type by going to the SOL Model tab. don’t pick “Random within category” because some models may not function correctly, and it is better to have known models so that all scenario models can be pre-created.The importance of pre-creation is described in the Performance section, 1.13.1.
You could change its initial velocity (velocity at creation), from the Velocity Control tab. From the same tab you can also give it a target velocity by moving the mph slider. This target velocity is the speed the ADO will attempt to maintain if road conditions allow.
To specify the ADO's path, right click on the model, and select Extend Path. Then right click on the road network to create its path. The path has to be a route that the ADO could follow.
DDO
Deterministic Dynamic Objects only follow the path and speed they are given. They can be placed anywhere in the network. They blindly follow their path, at the given speed, without regard for any other objects. To set their path, right click on the model, and select Add Path Nodes. Right click again and again for each node. A left click will stop inserting nodes.
Static Objects
These are objects or vehicles placed in the scenario which will have a visual representation at runtime, but no other behavior.
Coordinators
These are scenario objects which coordinate actions between various scenario elements. Triggers are the main coordinators, but there are also Sources and the Traffic Light Manager.
Triggers
These elements fire (perform some action) when there predicate is true. They are named by predicate type, so a Roadpad Trigger is one that is fired when the appropriate object drives over its road pad. An Expression Trigger fires when its expression is true. Time Triggers fire at the specified time, Follow Triggers fire when their follow conditions are met, and Traffic Light triggers fire when the appropriate traffic light state occurs.
Details of the firing conditions are authored from the trigger’s Predicate page. In the case of a Roadpad Trigger, you select the object that will drive over the trigger's roadpad. You can select it by name, type, or road. If you want the External Driver to trigger the action, choose By Type Set -> ExternalDriver.
All trigger have the same set of actions which they can perform. They can do such things as create and object, delete an object, set a cell or variable, set a dial or button on an object, terminate the simulation, etc. The ISAT manual goes into details on all the actions, and how they are authored.
Source
A source creates ADOs at specific locations, at regular intervals.
Traffic Light Manager
The Traffic Light Manager is used to author each intersection’s traffic lights. Section 1.14.1 gives an example of authoring with the Traffic Light Manager
Scenario Testing
To test your scenario, run it in rehearsal mode. Select Mode->Rehearse, and the scenario will perform, as if it is being run on the simulator. You will see the ADOs and DDOs following their paths, you can see triggers fire, and traffic lights changing. The External Driver will behave as if it is an ADO, following the rules of the road and responding to other objects.
The External Driver can be given a path, but it can’t be directed like an ADO. It can't be authored so that it changes lanes, or adjusts its speed. If you wish to test the scenario with behavior you expect of experimental subjects, you need to make a separate test scenario. Make a copy of your scenario, and replace the External Driver with a test ADO, giving is some unique name like “DriverTest.” Then author that test ADO so that it drives in the way you expect of the driver. You can use triggers to modify its speed, change lanes, stop, etc. Then modify the triggers that are to be fired by type, ExternalDriver, so that they are instead fired by Name, “DriverTest.”
DAQ Playback
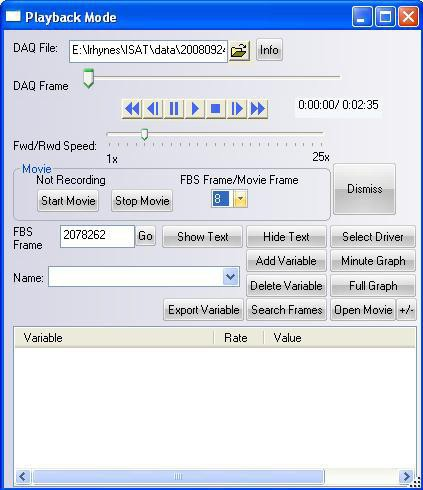
After you have collected data from an actual simulation run, you can play that file back using Playback mode. Select Mode->Playback, and a dialog like the one shown in Figure 1 will appear. Use the open file button to browse to the appropriate file. The bli file used in creating the DAQ file and the bli file open in the ISAT should match, or the Playback behavior won't match the road network.

