Difference between revisions of "Using the Minisim"
Anna Dizack (Talk | contribs) |
|||
| (25 intermediate revisions by 2 users not shown) | |||
| Line 1: | Line 1: | ||
| − | + | [[Table of contents|Table of Contents]] | |
| + | |||
| + | [[Making_the_Connections|◄PREVIOUS]] [[Settings_button|NEXT►]] | ||
| + | |||
<div>__TOC__</div> | <div>__TOC__</div> | ||
| − | ==Using the | + | ==Using the miniSim™== |
| − | ===Launching the | + | ===Launching the miniSim™=== |
| − | To start the | + | To start the miniSim application, double-click on the yellow "UTTC miniSim v1.x.x" icon. |
| − | + | [[File:mini.png|250px|thumb|right]] | |
| − | + | ||
| − | + | ||
| − | The | + | The miniSim software will load, but to use it, you may need to use the '''Alt + Tab''' key combination to select '''NADS miniSim Frontend GUI''' if it is hidden behind other windows. Drag the frontend GUI to the operator display. When launched in the future, the MiniSim GUI will apper in the operator display. |
'''NOTE:''' Another method to move any window to the operator display is to use '''Alt + Tab''' to select the window you want to move, then '''Alt + Space''' to show the window properties menu, the '''m''' to select 'move', then hold down the '''Right Arrow''' key, and the selected window will move to the right, and in abour 10 seconds should be visible on the operator display. | '''NOTE:''' Another method to move any window to the operator display is to use '''Alt + Tab''' to select the window you want to move, then '''Alt + Space''' to show the window properties menu, the '''m''' to select 'move', then hold down the '''Right Arrow''' key, and the selected window will move to the right, and in abour 10 seconds should be visible on the operator display. | ||
| − | + | [[File:MiniGUI.png|450px|thumb|center|MiniSim Frontend Graphical User Interface (GUI)]] | |
| − | + | ||
| − | + | ||
===Running a Scenario=== | ===Running a Scenario=== | ||
| Line 24: | Line 23: | ||
<li>The operator stops the drive by clicking on the '''Stop Drive''' button on the GUI. The '''Stop Drive''' button replaces the '''Start Drive''' button as soon as the drive is started. </li> | <li>The operator stops the drive by clicking on the '''Stop Drive''' button on the GUI. The '''Stop Drive''' button replaces the '''Start Drive''' button as soon as the drive is started. </li> | ||
<li>To quit the MiniSim, stop the drive first, and then click "Quit" once it is enabled. This will terminate all the processes of the MiniSim cleanly.</li> | <li>To quit the MiniSim, stop the drive first, and then click "Quit" once it is enabled. This will terminate all the processes of the MiniSim cleanly.</li> | ||
| − | <li>Scenario files end in *.scn and are located in the '''C:\MiniSim_v1.8.xxx\data'''directory.</li> | + | <li>Scenario files end in *.scn and are located in the '''C:\MiniSim_v1.8.xxx\data''' directory.</li> |
</ul> | </ul> | ||
| + | |||
| + | [[#top|TOP]] | ||
===Importing a Scenario=== | ===Importing a Scenario=== | ||
| Line 34: | Line 35: | ||
<li> When the system imports a scenario, it copies the *.scn file to the '''C:\MiniSim_v1.8.xx\data''' directory. The system also creates an *.eif file of the same name in the '''C:\MiniSim_v1.8.xx\data\RCM''' directory. The files in the RCM directory are the ones that appear on the drop down Current Scenario menu. You may ‘hide’ scenarios by placing the *.efi files in a folder in the RCM directory.</li> | <li> When the system imports a scenario, it copies the *.scn file to the '''C:\MiniSim_v1.8.xx\data''' directory. The system also creates an *.eif file of the same name in the '''C:\MiniSim_v1.8.xx\data\RCM''' directory. The files in the RCM directory are the ones that appear on the drop down Current Scenario menu. You may ‘hide’ scenarios by placing the *.efi files in a folder in the RCM directory.</li> | ||
</ul> | </ul> | ||
| − | + | ||
| − | + | [[File:fig22.png|500px|thumb|center|]] | |
| − | + | ||
| + | [[#top|TOP]] | ||
===Delete a Scenario=== | ===Delete a Scenario=== | ||
To delete a Scenario, choose the scenario you want to delete in the pull-down menu and click the '''Delete''' button. | To delete a Scenario, choose the scenario you want to delete in the pull-down menu and click the '''Delete''' button. | ||
| − | [[Settings_button| | + | [[Making_the_Connections|◄PREVIOUS]] [[Settings_button|NEXT►]] |
Latest revision as of 14:50, 24 February 2017
Using the miniSim™
Launching the miniSim™
To start the miniSim application, double-click on the yellow "UTTC miniSim v1.x.x" icon.
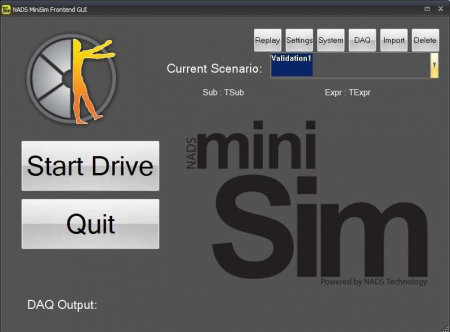
The miniSim software will load, but to use it, you may need to use the Alt + Tab key combination to select NADS miniSim Frontend GUI if it is hidden behind other windows. Drag the frontend GUI to the operator display. When launched in the future, the MiniSim GUI will apper in the operator display. NOTE: Another method to move any window to the operator display is to use Alt + Tab to select the window you want to move, then Alt + Space to show the window properties menu, the m to select 'move', then hold down the Right Arrow key, and the selected window will move to the right, and in abour 10 seconds should be visible on the operator display.
Running a Scenario
This is a pull down on the GUI for selecting the scenario. It is disabled during the start up.
- Choose the desired scenario from the list.
- The Start Drive button will be enabled by then; click it to start the scenario. It may take a minute to load the scenario.
- The operator stops the drive by clicking on the Stop Drive button on the GUI. The Stop Drive button replaces the Start Drive button as soon as the drive is started.
- To quit the MiniSim, stop the drive first, and then click "Quit" once it is enabled. This will terminate all the processes of the MiniSim cleanly.
- Scenario files end in *.scn and are located in the C:\MiniSim_v1.8.xxx\data directory.
Importing a Scenario
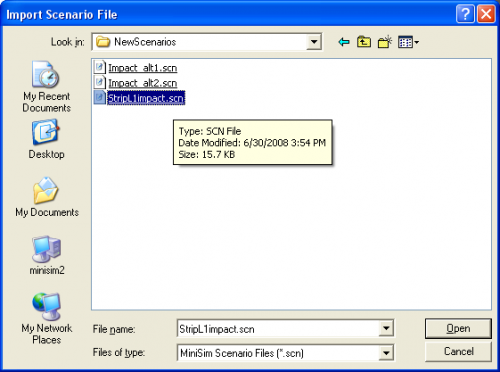
- Click the Import button
- Navigate to where the scenario(*.scn) is located , such as a thumb drive, and selected it.
- The scenario file will be copied to the proper locations in the MiniSim folder tree, and necessary additional files will be created automatically. The imported scenario will now appear in the pull down list and ready to be started.
- When the system imports a scenario, it copies the *.scn file to the C:\MiniSim_v1.8.xx\data directory. The system also creates an *.eif file of the same name in the C:\MiniSim_v1.8.xx\data\RCM directory. The files in the RCM directory are the ones that appear on the drop down Current Scenario menu. You may ‘hide’ scenarios by placing the *.efi files in a folder in the RCM directory.
Delete a Scenario
To delete a Scenario, choose the scenario you want to delete in the pull-down menu and click the Delete button.


