Moving Scenario Elements
ISAT User's Guide Table of Contents
Contents
- 1 Moving Scenario Elements
- 2 Deleting Scenario Elements
- 3 Undo
- 4 Defining Simulator Initial Conditions
Moving Scenario Elements
Moving a single scenario element
The technique and detailed outcome of moving a scenario element vary somewhat between elements. In general, to move a single scenario element, click on that element and then drag the mouse pointer across the screen. The element will move to follow the pointer. Once the mouse button is released, the element will be placed in the new location.
Note that there is quite a bit of customized behavior associated with different elements. For example, when moving a DDO, only the start position moves, not the whole trajectory. Similarly, when moving an ADO that has a path, the path is modified but not moved. If the ADO is moved to a different road altogether, or if it moved away from the road network, the path is lost. Moving a trigger or traffic source does not move the child elements, just the coordinator. Also, note that individual DDO path nodes can be moved using this technique.
Moving multiple scenario elements
To move multiple elements at the same time, select all of them (see section 3.7.1) and then hold down the Shift key while dragging the mouse pointer. All elements will be moved at the same time. The rules described in Section 3.8.1 still apply. For example, selecting two of the control points on the trajectory of a DDO and then applying a Shift-drag operation will move both control points at the same time.
Deleting Scenario Elements
Scenario elements can be deleted in several ways. You can select the element and hit the Delete key, or by right clicking on the element and selecting the delete option. Finally, you can select the element and then select the Edit->Cut menu option or use the associated shortcut key (usually Ctrl- X).
Undo
The ISAT supports multi-level undo functionality. After performing any action, select the Edit->Undo menu option to undo the most recent operation. Often, the actual label under the Edit menu will indicate the action that would be undone. For example, after issuing a Cut command that deletes a scenario element, the first option in the Edit menu would read Edit->Undo Cut. The Undo command can also be activated though the shortcut Ctrl-Z. Also, the and icons can be used for undo and redo.
Defining Simulator Initial Conditions
One of the first things that must be done when authoring scenarios is defining certain initial conditions that affect both the environment and the simulator driver’s vehicle when the scenario first starts execution. Note that ISAT allows the user to place the start position anywhere, although several limitations exist that ISAT does not enforce. For example, if the initial position is placed away from the road network, the vehicle dynamics will not be able to determine the elevation of the terrain, and the scenario will be interrupted. In addition, it is the ISAT user’s responsibility to place the initial position so that the simulator driver (subject) will not be surprised when the scenario begins (for example, because of an awkward orientation or high-speed heavy traffic nearby).
Specifying where to start
The ISAT allows specification of the simulator driver’s position when the scenario begins. To specify the initial position of the simulator driver, select the Insert->Initial System Conditions->Own Vehicle menu option. After selecting that option, the cursor turns into an insertion pointer:
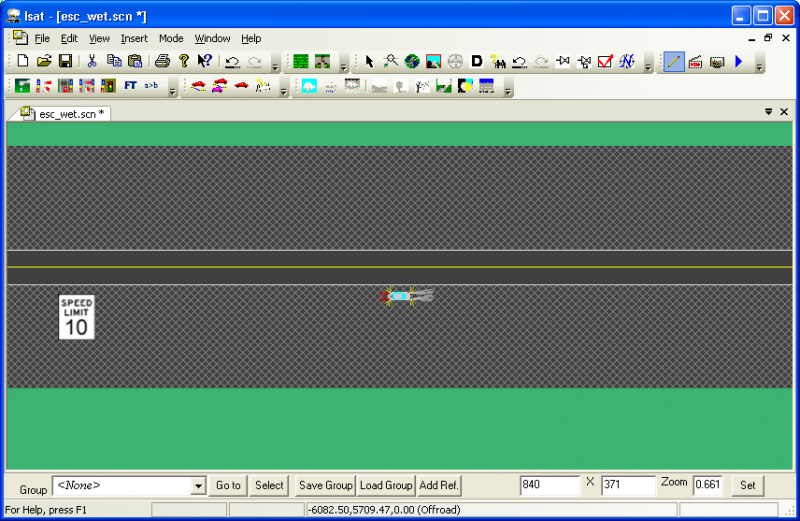
Clicking the left mouse button inserts a vehicle at the position of the cursor. This vehicle represents the position and orientation of the simulator driver at the beginning of the scenario. Figure 3-33 illustrates the appearance of the vehicle representing the initial position. In addition to specifying the initial position of the simulator driver, the vehicle can act as the human simulator driver while in the rehearsal mode of the ISAT. This is achieved by using an ADO whose start point is the initial position of that vehicle. For all practical purposes (trigger firings, traffic manager, traffic light manager), this ADO acts as the human simulator driver.
Specify a path
A path can be associated with the simulator driver. This path has a dual purpose. First, it can act as a mnemonic for the scenario author of the intended path of the simulator driver though the network. Second, when in rehearsal mode, the path is followed by the ADO simulating the driver. Naturally, when on the actual simulator, nothing can be done to ensure that the actual path taken by the simulator driver is the same as the path specified here.
To specify the path, right-click on the vehicle and select “Extend Path”. The cursor will change into this shape:
Click on points on the road network to extend the path. To extend the path, click on road locations that an actual vehicle could drive toward from the prior point (or the start of the path) without crossing more than one intersection. Each time a point is clicked, if the location can be connected to from the prior point, a set of blue boxes will outline the route. If there is no access to the new point from the prior point, the path will not be extended. To terminate the path selection, click anywhere with the right mouse button.
Changing the initial orientation
To change the orientation of the initial position right-click on the vehicle representing the start position, and then select the option “Rotate” in the context menu that will appear. After selecting that option, the start vehicle will rotate to follow the cursor. Click any of the mouse buttons when reaching the desired orientation. Note that the actual position does not change, only the orientation does.
Moving the initial position
To change the initial position, click and drag the left mouse button on top of the vehicle representing the start position. The initial position will change to follow the mouse cursor. When the left mouse button is released, the new position of the start vehicle will be set to the current position of the cursor. Note that when moving the initial position, the orientation does not change, but if a path has been specified, it is removed.
Specifying other initial conditions
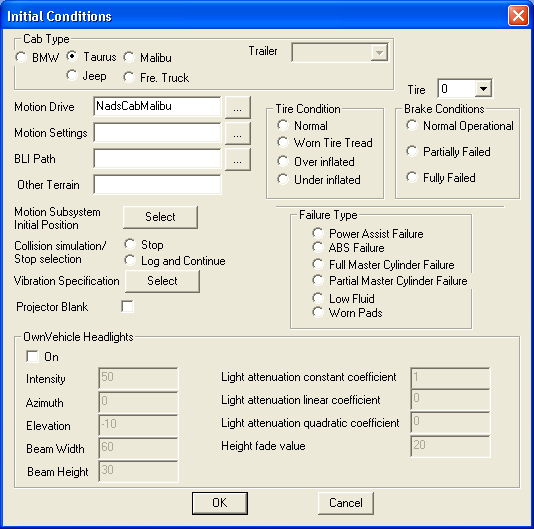
In addition to the placement of the vehicle at the beginning of a scenario, the user can select conditions that affect various aspects of the simulator. All such conditions are collected in a single dialog box. To show this dialog box, select the Insert->Initial Scenario Conditions->Other menu option. The dialog box illustrated in Figure 3-34 appears. The dialog box contains various areas that allow specification of the following types of initial conditions.
Cab type
This selects the cab that the simulation is expected to use. Clearly, selecting this cab in the ISAT does not automatically force the specific cab to appear in the simulator. In fact, switching the physical cab can take as long as eight hours. Instead of a definition, this setting should be considered as a request, either when the scenario is developed by researchers who plan to submit their scenarios to NADS staff, or as a means to document the actual cab used for a particular study.
Motion drive and Settings file
These buttons and associated text-fields allow selection of the file that configures the motion system. This very specialized subject is not applicable unless scenario files are specifically targeted to the NADS, so no additional information is provided here.
BLI Path
If necessary, an alternative path where BLI files are stored can be provided here. By default, BLI files are stored in a directory contained in the NADSSDC_LRI environment variable.
Other Terrian
The NADS software can be configured to utilize a high-resolution low-latency terrain interrogation technique that is overlaid on top of the information contained in the BLI file. When that software is in use, the terrain file is specified here.
Motion subsystem scenario
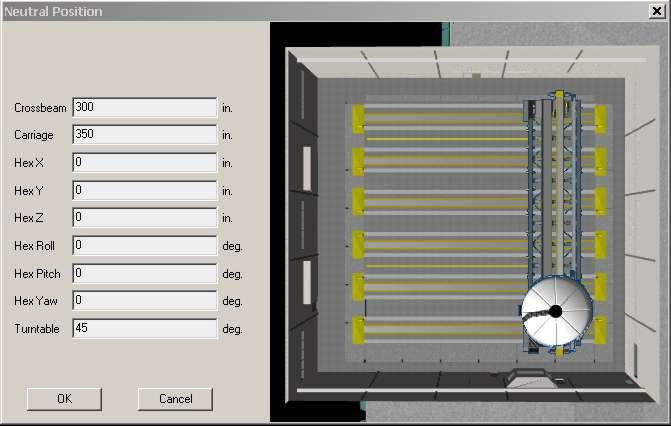
The neutral position of the motion base is in the center of the NADS X-Y track, providing equal amount of travel space for braking or acceleration maneuvers and for left or right lane changes. When the actual maneuver is known a priori, the neutral position can be changed to favor the maneuver. Whereas this setting can be changed dynamically using triggers, it is also possible to define the neutral position at the time that the scenario starts. Pressing the “Select” button adjacent to the “Motion Subsystem Scenario Position” label pops up a dialog box shown in Figure 3-35. The dialog box allows selection of the default neutral position for the motion system. A top down graphic of the simulator dynamically changes to reflect the values typed in the text fields.
Collision Simulation
This setting allows the user to determine what happens when there is a collision between the simulator vehicle and a scenario element or a static object. There are two options. The first option stops the simulator, and the second option simply logs the collision and continues the run. Note that selecting “Log and Continue” does not necessarily include collision information in the DAQ file. The data collection specification must include the collision flag as part of the collected data.
Tire Conditions
The NADS can simulate various tire failure conditions. Specifically, any tire can be made to act as if it has worn tread or as if it were over or under-inflated. This setting specifies the initial conditions for all tires. The tire can be picked by using the drop down menu and the failure condition for that tire is picked by selecting any one of the buttons listed within the “Tire Condition” box.
Brake Conditions
The NADS can simulate various brake failure conditions. Specifically, either overall brake system failures or failures of brake modules on specific wheels can be simulated. This setting specifies the initial conditions of the failure state of the various brake systems and subsystems.
Other Vehicle Failures
This setting controls the initial conditions of various other failure conditions associated with the vehicle driven by the simulator driver.


